Wednesday, 31 July 2024

Deaf Ray Overdrive

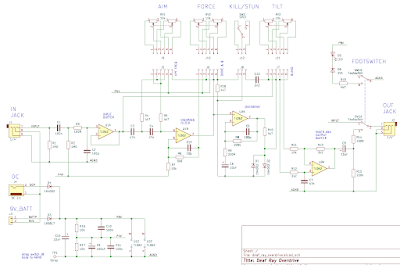
 After many software based distortion variations on Basscape I thought I would go more old-school. Most overdrive circuits are too gentle and most distortion circuits are too fierce in my very limited experience forcing me to make a decision as to which one do I want. Decisions were never my strong suit so I chanced upon an interesting schematic from an Orange Crush 15R. 


The overdrive in this schematic is shown at the top centre. By varying the drive control it doesn't just change the gain before a pair of clipping diodes that either shunt the signal to ground or use it as feedback, it blends between them. With the drive at max it is full-on hard shunt clipping, with the drive at minimum it is a barely perceptible feedback soft clipping with the ability to dial in anything in-between. Brilliant!


To give it a different feel to the original, the signal is passed through a 2-pole highpass filter that can be varied from around 200Hz to 650Hz. In addition to the frequency adjustment, the Q of the filter (the peakiness of the response) is controlled in tandem with the drive control described above. At low drives the filter is fairly relaxed  removing the low end that can otherwise dominate the overdrive tone. As the drive is increased, the filter Q rises and the tonal character can become more exciting and distinctive. 


The range of Q goes from about 0.7 (vanilla) to around 2.3 (mint choc chip). As with the high-pass frequency range this was mostly determined by trying it out until the the best range was found for the controls. The economical-on-battery-juice-and-my-pocket TL062 was used and all pots were chosen to be the same value so I only had to buy one lot. 


As I tend to play bass much more than a six-string I wanted a blend control more than an output level. The blend mixes the overdiven signal with a slightly filtered dry signal to still provide the bass guitar underpinnings even if theres a good helping of edginess going on. Which there usually is...


To avoid a complete rats nest of wires I mounted the pots on a separate piece of veroboard. The whole lot was fitted into a 1590BB diecast box and some artwork made to confuse onlookers. The Deaf Ray theme came about as I liked the idea of a laser on the front and in turn this caused the sensible controls like 'frequency' and 'drive' to be renamed to 'aim' and 'force'. The 'kill/stun' switch gives a more cutting sound with higher drive (kill) or a gentler warmer tone (stun).


The artwork was printed onto A4 coloured adhesive paper and lined up with the drilled holes before covering with a transparent adhesive film layer to protect it. Much better looking than my usual permanent marker pen scrawl. 


All the parts managed to squeeze into the box along with the two 1/4" jacks, dc supply, footswitch and controls. 


I was so pleased I made two...

Aim. Fire!


Monday, 1 August 2022

Just For Effect

During the tuner development I noticed another ESP32 module that has an audio codec on-board. A crazy idea of making a bass digital effects box appeared in my head and all that was needed was a bit of wiring up and a few lines of code...

ESP32-A1S module includes an audio CODEC

After quite a bit of trouble getting the right ESP32 environment installed I eventually managed to get the starter projects running. The next stage was getting the codec to operate in loop-through mode to give a playground where I could mess about with all the samples any way I wanted.

Back in the real world, I decided a 350x100x50mm section of aluminimum U channel would be an ideal housing as it had been lying around in the garage for years. There was a hole already drilled about 60mm from one end so 3 footswitches symmetrically arranged seemed the best plan. 

Aluminium drilled for the footswitches

Connector holes drilled too

An advantage of software is the fact that nothing is completely hard-wired. Having 3 effects in series is plenty as long as they can be swapped about. The footswitches need to be individually identifiable so effects can be assigned to them easily. After a bit of sketching I decided to use colours and shapes to distinguish between the 3 effect channels and also light up when active. This would look much better than a 5mm LED and would not require any labels.

Coloured perspex, footswitches & ESP32

It took a few attempts making a 100mm square piece of perspex / acrylic light up evenly. Initially I used coloured perspex with discrete LED edge illumination, but there was only a small puddle of light round each LED. It needed more optical horsepower so I sourced a flexible LED strip that wrapped all the way around the edge of 5mm thick translucent perspex. With the original colour perspex on top the lighting was even across the area regardless of the colour.

Translucent perspex for even illumination

Coloured perspex and fitted footswitches

I had to make sure the relative sizes of the different shapes and colours looked about right so a temporary black paper cover was cut out and fixed on. I thought about countersinking the top screws that fix the perspex to the aluminium, but the cap-heads give it a solid industrial look which gives the top some additional interest.

Temporary shapes!


An Inside Job

For the effect software running on the EPS32 module I pinned down the effects that I wanted: Flanger, Phaser, Chorus, Overdrive and Reverb. I've made a few distortion boxes before such as a Fuzzface and diode clippers, but most of the other effects were never possible with a handful of analogue components as they all require time delay elements. 

Making these requires delving into circular buffers, comb filters, allpass filters and DDS oscillators then linking them up in the right way with a bit of trial and error. To get the maximum amount of processing into the time available, all signal computation was kept as fixed point. Decimal places always take longer to sort out...


Links for the keen...

Time Varying Delay Effects

Artificial Reverberation


Push The Pedal To The Metal

A guitar effects pedal is will be trodden on, tripped over and kicked about. Adding dozens of pots to allow adjustments to be made is only going to result in more things to snap off. Seeing as the ESP32 module is all singing and dancing (well, it has bluetooth built-in), the possibility of changing settings remotely seemed the way to go.

All effects, parameters and values are encoded into a single string which can be easily sent through the bluetooth channel. The ESP32 has the additional benefit of having dual cores, so as well as handling all the bluetooth comms, it can also do some preparatory work (ie floating point calcs) for various IIR filters that need to be primed once per transmission without taking any processing power away from the signal path. 


Finished build

A 75mm x 25mm rectangular cutout was made in the side of the aluminium and a couple of 5mm perspex offcuts used to fill it. The ESP32 module is mounted on pillars to ensure its bluetooth aerial aligns centrally to this aperture to allow a good reception range. The veroboard on the left contains a 5V regulator for the ESP32 module and a 9V regulator for the input amplifier. 

Inside Basscape

The afterthought piece of veroboard is required to reduce the common-mode noise from the ESP32 audio output. The both output channels are now used in anti-phase and fed into a differential amplifier which does a good job of keeping the ESP32's own squeals attenuated. This seems to be at its worst when bluetooth is active. 

Using the black cardboard cutouts as a guide the final black vinyl covering was cut. Carbon fibre end plates were made from some offcuts which add to the industrial look.

Basscape - catalogue pose

Basscape and friends

Basscape - all effects on and lit up


The App

Initially the highly recommended Serial Bluetooth Terminal Android App was used to debug the ESP32 transmission strings. I settled on a simple ASCII based coding scheme that sends the effect type character, followed by a parameter character and finally the 16bit value. For example 'RM0032' will set the reverb mix to 50.

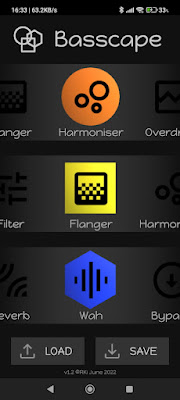
The Basscape Android app was created with AndroidStudio to allow the effects to be selected and swapped around. The main page ties in with the colours & shapes theme mentioned earlier. Effects are changed by moving them left or right. They are in a circle so after a few swipes you're back to where you started. If two positions show the same effect they are both greyed out. After each successful change a bluetooth message is sent to the EPS32 module ensuring the effects heard running are synchronised with the screen display.

Basscape App - main page

To change parameters, the effect icon (in its coloured shape) is pressed which opens the effect page. This is a single app page, in the correct colour for the chosen channel and showing the correct parameters for the specific effect. 

Channel One - Orange Circle - Harmoniser

There are up to 3 drop-down menus and 6 slider controls arranged in 3 identically laid out sub-groups. Not all effects use all controls, so some can be left blank. After changing any control a bluetooth message is sent to the ESP32 module so that the effect update can be heard straightaway. 

Channel Two - Yellow Square - Flanger

For Bluetooth comms to operate properly it has to be done separately to avoid making the main screens unresponsive. The Bluetooth comms is run 'behind the scenes' as a separate asynchronous task <https://stackoverflow.com/questions/9671546/asynctask-android-example>. This was another tricky section but makes the App / ESP32 interface really slick and effortless.

Channel Three - Blue Hexagon - Wah

Effect and parameter storage is used so that when the App is re-opened it immediately reinststes the previous values and sends them to the ESP32 module. A final stage was providing Load and Save buttons so that effect settings can be stored to suit different occasions. Saving was a bit tricky in terms of file management, but loading was worse as once loaded the manually moved effect Recyclers had to assume the loaded-in values without human intervention. 


Trying it all out & adjustments along the way

When the most processor intensive reverb setting was used with other effects there was a tendency for the processing loop to timeout causing stuttering. The sample rate was reduced from 44.1kHz to 32kHz and although sceptical, the sound even through full range speakers does not suffer unduly.

The initial setting up of the bluetooth link takes 2-3 seconds. This delays the main screen being displayed so a splash screen was created. Starting the App now shows the splash screen for 2-3 seconds and then the main screen is presented.

Basscape splash screen

The wah effect was added quite late in the day. Without a position sensitive footpedal, the wah has to really be an autowah controlled by either the signal amplitude envelope or by an LFO. The (floating point) filter coefficients have to be frequently recalculated which requires juggling further computation between the two ESP32 cores. 

Values are updated every two milliseconds. To avoid glitches, two sets of parameters are used internally in a flip-flop manner. In other words the 'V' parameters are used in the effect whilst 'W' is undergoing calculation. Once the calcs are done the effect switches to the 'W' parameters allowing the 'V' ones to be recalculated, and so on. Seems to work a treat in practise :-)


Soundclips

And this is how it sounds! More fine-tuning of the key parameters will probably improve things, but these clips give an idea of what each effect can do. There are a few ropey bits - the harmoniser doesn't track the pitch perfectly, the overdrive can be a bit noisy and some effects can be a little harsh, but these can be worked on over time. 

My current favourite is to have the harmoniser, flanger and wah all on together which can surprise unsuspecting members of the audience quite nicely...


Still to do one day...

1. Chorus, Phaser, Flanger and Reverb - gentle filtering on outputs to reduce some harshness from the comb and allpass filters. 

2. Chorus, Phaser, Flanger and Reverb - buffer purging so that no weird noises pop out when switched back in.

3. Harmoniser - autotune option to give nearest stepped note


Saturday, 2 July 2022

Last Year I was Mostly...

Not got round to posting an update for a while, but over lockdown I was able to get some ideas out of my head and put some left-over parts them to good use. 


Driver Checking

This has nothing to do with the DVLA, but instead is a simple speaker measurement unit based on an Arduino with a separate AD9833 DDS which can give a sine shaped output. The Arduino controls the DDS frequency and its ADC allows speaker voltage and current measurement. The frequency is swept to find the points of maximum and minimum impedance. It's not the most accurate, but better than doing it manually, and gives reasonable results when compared to manufacturers data. This may allow me to find a new use for any unknown drive units hanging around...

Florence in a 4x10 cab

I have Celestion BL10-200X drivers in my 4x10 cab, here's the measurements of my 4 drivers (A, B, C & D) when I took them out with my assistant to repaint the front.


 Mfr   A   B   C   D

fs 73.0 61.3 69.2 65.9 72.5    Hz

Re  5.8  5.84  5.86  5.84  5.83   Ohms

Qms  3.58  3.31  3.09  3.13  3.12

Qes  0.56  0.46  0.51  0.49  0.54

Qts  0.48  0.40  0.44  0.43  0.46


Speaker D seems the closest to the published specs.


Here it is checking out an old 8" Soundlab 8LUX driver.


Driver test running

And the results are in:

fs 36.4  Hz

Re  7.15 Ohms

Qms  2.35

Qes  1.13

Qts  0.76


Driver test results fs, Re & Qts

Driver test results Qms & Qes


New Tunes For Old

In June 2021 I wanted to create a bass tuner to fit in my main amp. The Arduino just didn't have enough grunt for this, so I tried an ESP32 module and a 128x64 graphical LCD display.

Inside it uses the u8g2 display library with a modified Haichi Maru font to produce the smiley faces. The tricky stuff samples the signal at 4kHz, uses 512 point FFTs plus some filtering and topped off with Gaussian interpolation courtesy of the nice people at CERN. Such a name dropper! It's just a better way of working out where the real peak should be given the height of the ones either side.

I didn't want any buttons so the tuner just responds to a reasonably constant note. When the input signal is quiet it waits patiently, smiles and pokes its tongue out. 

Tuner - Idle

Tuner - Very idle

Once a consistent note is played it switches to the tuning view - the aim is to get the line horizontal, at which point the triangular markers are filled.

Tuning View

If it decides someone is playing (ie the notes keep on changing) then it cycles through oscilloscope, speaker and frequency views for amusement. Well it amuses me anyway.

Tuner - Oscilloscope display

Tuner - Speaker animation

Tuner - FFT display


LFO 

Over Christmas 2021 I decided to redesign the LFO section on my synthesiser that was built in 2007. It has worked well for several years, but when changing the duty cycle with ramp based waveforms, the frequency changes too. This limits the usefulness of the control as the interaction makes setting up awkward. My assistant took a keen interest.

Florence checking the synthesiser

In the centre position the duty was 50:50 as expected, and the current charging / discharging the main capacitor is equal in magnitude at that point. To put some numbers on it to help understand what's going on, the charging and discharging current could be +2mA and -2mA, equating to 1s rise and 1s fall to give a period of 2s or frequency of 0.5Hz. 

Moving the threshold from the mid 50:50 point to 90:10 gives +0.4mA and -3.6mA. The rise time will be 5 times slower at 5s and the fall time almost twice as fast 0.9s. Together these give a period of 5.9s which is a frequency of around 0.16Hz. It does give the right duty cycle, but the frequency is now much lower.

There is no easy way to keep the frequency and duty cycle independent, but there is a flakey analogue way that will vary with temperature and phase of the moon, so we'll go with that. Going digital in the middle of an analogue synth doesn't seem right...

Captain's Log (Amp)

To keep the same frequency, the above duty cycle needs to provide a charge current of +1.1111mA and a discharge current of 10mA. This gives a rise time of 1.8s and a discharge time of 0.2s. These still give an overall period of 2s (0.5Hz) and the right duty cycle. A reciprocal relationship is needed here (100/90 = 1.111mA and 100/10 = 10.0mA). Log amps here we come...

Log amp and antilog amp circuit blocks

From school maths (A * B) / C can be calculated using logarithms: Antilog( logA + logB - logC ). Once the log and antilog amplifier circuit blocks have been made, the rest is straightforward adding and taking away.  

Seeing as I was passing by I also improved the sine shaping and made the duty cycle able to be controlled by the other LFO.

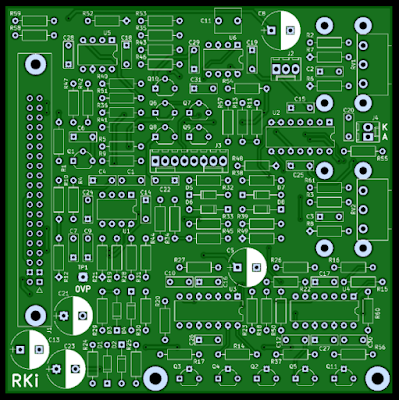
PCB artwork simulation

When controlling the VCF it can now cycle from wob wob wob to bow bow bow without changing the rate significantly. Sooooo much more usable than the old one.


Old and new LFOs


Saturday, 27 February 2021

The Finishing Touches

 Bouncing along

After a successful wind-up, the completed spring was slid onto the main tube. A 90 degree bend made at the bridge end allowed the coil to be anchored by passing the wire through the last fret position hole (drilled earlier for guidance). Each coil was nudged into position before fastening at the head end using a bicycle brake cable clamp-bolt. Finally the entire spring was glued to the tube with epoxy resin to prevent it wandering about. This was a bit messy and a fair bit of IPA was used in cleaning off the excess before it set.


Araldite securing the spiral frets


Tuners

Conventional closed gear tuners were used. These are normally fitted into the headstock which is around 15mm thick. The stainless tube is only 1.5mm thick and is curved! To get around this (quite literally) four circular aluminium spacers with OD = 30mm, ID = 16mm and length 24mm were sawn into 16mm & 8mm lengths then shaped to fit either side of the tube wall. 


Holding jig for the tuner spacers


It took a fair bit of whittling to match the tube shape. The tuners were then fitted to the tube using these spacers to sandwich it all together. The smaller convex spacer is on the inside. The small wood screw that normally prevents the tuners turning under tension is replaced with an M2 bolt that also passes through the main tube wall and clamps both parts of the shaped spacer.


Bridge

The separate parts of the bridge were assembled into fixed and adjustable sub-assemblies. The fixed part is bolted to the body tube and the adjustable part is clamped to this using M6 x 75mm bolts. This allows +/-4mm of height adjustment and a certain amount of sideways wiggle too. Angled holes were drilled into the taller end part of the bridge for the strings to pass through before sanding and polishing. 


Assembled bridge before string slots cut

The string grooves were cut into the saddle, and a horizontal groove cut underneath to allow space for the piezo pickup (see below). A drawback of this single saddle style of bridge is the limited intonation adjustment. I'm over it already...


Pickup

As this guitar is based on a tube, the strings cannot 'fan-out' from the nut to a larger bridge spacing without causing the action to increase significantly too. The spacing at the bridge is kept to be nominally the same as at the nut to prevent this increase in the action height and therefore requires a very small pickup too.

The smallest pickup I could find was for a Ukulele. Even this was too long so it had to be dismantled. The individual piezo elements measured around 7.5 x 1.2 x 1.2mm. 


Piezo pickup parts

Piezo pickup for a ukelele

Completed bridge with piezo elements


The first attempt sounded wrong using 3 elements. The middle element must have been too high causing The E-string end to be very weak. The centre element was removed second time around and with just two elements it sounded peachy! 


Altogether Now 


Tubular Bass - top


I'm very pleased with the spiral frets - they are no more difficult to play than straight ones. I deliberated over shimming the zero fret to make it slightly taller but actually got round to it. A truss rod was not required as the neck is an inherently stronger shape and shrugs off the string tension without showing any signs of curvature at all. A properly set up bass neck does actually have a slight bow to accommodate the string as it vibrates back and forth. This cannot be achieved here.


Tubular Bass - bridge


I've never used piezo pickups before and the sound covers the full audio range regardless of cable length. A common-place wound inductive pickup will have an electrical resonance that can be worsened by excessive cable capacitance. This can be caused by a long or a cheap cable. Above this resonant peak, which can itself add a bit of sparkle in the right place, the output drops noticeably reducing the amplitude of higher frequencies. The piezo pickup is in essence a capacitive pickup and additional cable capacitance makes very little difference. 


Tubular Bass - looking down on the tuners


The tonal character of a stainless steel tubular body, new strings and a piezo pickup system result in an extremely bright sound. This can be tempered by adjusting the playing position of the right hand to give a fuller sound. The same trick can be done on a conventional guitar but due to typical body shapes only a small range of playing positions seem feasible. On the tubular bass, there is no body or other points of reference, so the right hand can carry on up the fret board giving almost hollow synth-like tones.


Tubular Bass and friends


Other than that, to be honest, it's a complete nightmare to play 😮 The string spacing is very tight for the right hand, and the picking hand has to reach round under the tube for the higher strings. 

Ergonomics were not that high on the list of important considerations.


Tubular Bass taken for a spin


It has stretched the concept of guitar construction in a new direction, but also reinforced that conventional guitars are good examples of incremental development. That being said, with a D-shaped tube and some welding, a more familiar neck and body could be crafted giving rise to an instrument that would have more universal appeal. 

But I like the prototype - it still looks like an exhaust pipe from a Lamborghini Murcielago 😊


Tubular Bass and Vigier Arpege


Friday, 15 January 2021

The Spring Winder


The Spring Winder is based on the usual method of a rotating former and a wire dispenser moving along its length. For an ordinary spring, the wire would be moved at a constant rate, but for a fret-spaced spring it needs to be fast at one end and slow at the other. A linear actuator was obtained as they are popular in 3D printers. They are built from readily available extrusions with a stepper motor driven lead-screw. The spring length needs to be roughly 700mm, so a 1000mm actuator will allow some breathing space.

Aluminium Extrusion cross section

Linear actuator parts

An Arduino Uno was purchased as I really wanted to try one out! No additional programmer box or pricey software is required, just a USB A-B lead and a (free) download of the Arduino IDE. The built-in functions make pin operations straightforward and makes it a great introduction to programmable hardware.


After successfully blinking a few LEDs on and off, the main circuitry was developed to PWM control the winding motor and use a DRV8825 module to run the stepper motor. An LCD alphanumeric display was also added to show useful info. 


The winding former was estimated to be 30mm when using 1.8mm diameter stainless steel wire and a 50mm inside diameter. The winding speed was set at a fairly pedestrian 12rpm and the position of the winding former is monitored by a rotary encoder. 


The whole fixture was built on a combination of plywood and MDF measuring about 1200mm x 400mm x 45mm and uses pillow block bearings to constrain the winding former and a brass clamp to provide wire tension. The first winding motor tried out didn't have enough torque, so a larger motor was sourced connected to a chunky 36V/10A PSU. To negate the effect of loading on the motor speed, the PWM controller uses a small amount of current feedback. 

Winding a spring

Florence checking the spring winder

The main software loop takes the rotary encoder count, calculates* the new actuator position and sets the number of actuator steps so that this can be achieved. Using the micro-stepping facility of the DRV8825 module gave a nice round 100 steps per mm and worked up to a maximum rate of 8000 steps per second. If the quantity of steps are not completed within 30ms an error flag is set and the loop repeated anyway. The slow (~12rpm) winding speed ensures that this overspeed condition does not occur. This process is repeated until the windings are complete. 

Spring fully wound

Spring winder display


*The calculations use a simple linear ratio for the lead-in and lead-out at each end, and a more involved formula that comes from working out fret positions for the bit in the middle. 


distance = scalelength * (1.0 - 2.0 ^ (turns / -12.0))


An Unexpected Turn Of Events


Smart people will already have realised that turning the winding motor 12 times to get a whole octave of windings does not result in 12 finished coils! The ratio of spring ID to former ID had been overlooked. The spring is wound on a 30mm former, but when released (and yes, this was a scary bit) it rapidly returns to the more relaxed state of 50mm diameter. It is the same length of wire in both cases so the larger relaxed diameter has less turns. To correctly compensate for this it needs to rotate (50/30) more turns than I first thought. 


After this, I settled for 4 lead-in turns, 4 lead-out turns and 26 fret turns based on 50mm ID. This equates to around 7 lead-in turns, 7 lead-out turns and around 44 fret turns when mapped to a 30mm former. The 26 fret turns allows some freedom in choosing the best 22 (plus a zero fret). 


After several rounds of debugging it was ready to run. Winding the spring took around 5 minutes and apart from a bit of congestion on the lead-in, it nailed it first time! The video clip speeds up the action into just over a minute.


Doing The Rounds


In between working on the Spring Winder, other parts of the Tubular Bass also needed to be made. The nut and bridge assemblies are both made from aluminium, mostly 15mm thick, but the nut and saddle are only 6mm. To anchor these, 47mm discs are turned on a lathe** and fitted inside the tube. The visible parts of the nut and bridge are bolted to these through slotted holes to allow a certain amount of height adjustment but keeping things sturdy and rigid. 

Tubular bass - bridge parts

Tubular bass - bridge parts


Tubular bass - bridge assembly

**I don't have a lathe so I laid a benchdrill on its side instead. Each part was rough cut into an octagon shape with an 8mm centre hole, then turned lathe-style. It doesn't have quite the same bearing system as a proper lathe so there is more judder and it doesn't give a great finish but it's good enough. Don't try this at home - it makes a lot of swarf!

Dodgy machining practices