Monday, 2 June 2008

Shaping The Body With Chiselled Features

The plan view of the guitar was as far as I had really got with my full sized sketches - I am not known for possessing any great depth. To carry on the fish pretzel theme that I started on the headstock, I want the body wood to look a bit organic, to flow and overlap rather than just sit there and look heavy and cumbersome. So this requires a fair bit of wood removal to make it happen.


At first the router was used. This is great for removing material, but in this case is self-defeating. After a while, all the flat surfaces that the router needs to sit on have been buzzed away, leaving a choice of it sitting on precarious 'islands' of the original height, or freeform use. Hmm, sounds like a trip to A+E is only seconds away if I try that too often, so it is back to the manual methods after this brief flirtation with power tools.


Chisel! The word sounds a misleading - like a chisel is used to stab at the wood and rip a bit out. With a decent (and sharp) chisel the ash can be worked with a bit of effort. Ash has a large grain pattern and it seems to change from quite easily workable in some parts and really hard in others. This takes some getting used to, but understanding this helps to work with the wood and not against it. I had to keep sharpening the chisel on an oilstone throughout the shaping.


Between major bouts of chiselage (what a good word - I wonder if it exists?) sanding the contours with a block helps to blend the shaping into pleasant curves.

There are a few places on the body, inside the teardrop shaped cutouts, where it is difficult to work on. This could be why nobody else makes a guitar body that looks like this?


Here's the body parts pushed back onto the neck. All the shaping and radiusing apart from the the initial rough router work has all been done by hand (and aren't those hands feeling sore!). The top has been shaped so that my forearm will have a nice resting spot. From the front the central walnut stripe is just about visible.

The truss rod channel and positions for the fboard lights are just visible further up the neck, at 3rd and 12th fret positions.

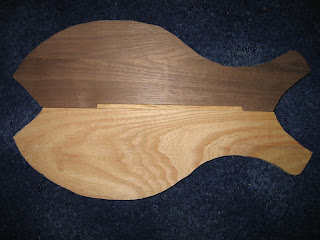
It isn't easy to see in the photo, but there is still a way to go. The body is still proud of the neck in places, and the bottom of the guitar needs to end in a curve (the neck is just sawn at an angle at the moment).

The next step is to think about where I place two volume pots, a 4-pole pickup selector switch, the 1/4" jack socket, the pacman leds on/off switch & select button, the pacman led circuit board and the batteries. No problem, I'll put it all in one of the holes...

Monday, 26 May 2008

Stripping In The Blue Light District

The Ibanez body is quite a dark brown color. I thought it was a solid paint finish for many years, but if you take a fresh look there is definitely a decent bit of woodgrain going on underneath a heavy lacquer.

The bass is a lawsuit model dating from the mid-seventies and has had some remedial work carried out already. The original Gibson three-post style bridge was replaced (quite rightly) and a thumbrest was ditched. The holes left were filled with wooden plugs and under the dark lacquer the repair work was practically invisible. The bizarre shaped cutout that looks ideal for storing ice-lollies was hidden away under a scratchplate.


Half way through the paint stripping and Chewie & me are wondering if perhaps we have been a little bit hasty. It is looking quite rough now. Talking about different new paint finishes keeps us going...


Once the paint stripper has done its chemical nastiness, we attacked the surface with sandpaper. It was like trying to sand glass. At this stage other uses for the body were found, such as the latest in guitar-inspired lingerie...


It took power tools and some good old fashioned grunt to shift whatever was still clinging to the wood, but evetually the mist started to clear. The paintjob had been hiding quite a nice veneer. The body could now be seen properly and was constructed from five layers of differing thickness hardwood (plus two [ash?] veneers), with the grain direction changed on alternate layers. With the contouring on the body these layers show up as go-faster-stripes. When the hardware gets bolted back on, this is really going to look smart.


Back in the land of fboard lights, the plastic dots have been shaped using 6mm and 8mm formers. The dots have been glued into the board and here are the results:


Funny how turning the lights on makes the wood get darker...

Monday, 19 May 2008

Lighting Up Time

Chewie & me decided a while ago that lots of little wires and lights inside a neck would no doubt cause trouble. Lights are essential, but wires need to be kept to a minimum. Space is pretty limited so we came up with the idea of using a long piece of veroboard cut to shape to connect to all the leds. The walnut fboard stiffening was removed with a dremel mini circular saw and a chisel. It didn't need to be exceptionally neat as it will be hidden from view eventually.


Blue surface mount leds were ordered a few months ago, but they didn't look that blue to me. A second lot of leds were sourced and these looked a lot nicer. These ones were even smaller - 0603 size, 1.6mm by 0.8mm! Each led has a 100 ohm series resistor, and all these led / resistor combinations were connected in parallel so that only two wires are needed to be fed into the main body.

Soldering surface mount parts can be quite tricky. The small black rectangle at the top of the board is the resistor. These are 1206 sized (3.2mm by 1.6mm). The led is barely visible, but is soldered between the resistor and the yellow wire coming up to meet it. This is part of the octave marker, the other resistor / led is at the bottom.


Strangely I found that two of the ten leds were more green than blue. They were all packaged in a strip so I was expecting a much better colour match. Fortunately the ibanez neck only needs eight, so the two dodgy ones were saved to look green on another day.


Once all the parts where fitted, the assembly was tested, run from 5V with an extra 470 ohm resistor. To reflect as much light forward as possible, the veroboard, solder & resistors were painted white. A hole was drilled at a particularly cunning angle in the neck and the fboard was placed on top to give an idea of how the finished neck will look. Not bad methinks. It still needs clear dots put in place, but it has definitely livened up the old-timer...

Tuesday, 13 May 2008

Back To The Ibanez

I haven't done much to the Ibanez bass since the fboard was sawn off a few months ago. The fboard itself was quite fragile, and the neck was quite warped. In fact the neck was so warped if it was thrown in the air, it would have probably come back again...


The top of the neck was planed straight again which removed a fair bit of material. The back was sanded to remove the mess left by acetone and old cracked paint. It is amazing how much wood isn't there! As the neck thins down near the headstock, the large 1/2" wide by 3/8" deep channel doesn't seem to have a great amount around it. It is only 15mm deep around the first fret. Blimey. It is not surprising that heads snap off on occasions...


Talking of snap off, the fboard did actually fall apart. The saw got a bit close at the 19th fret and was just held by a few hairy bits of rosewood and some finger lint. It didn't last long.
The back of the fboard had to be carefully sanded to remove the worst of the saw marks and to give a suitable surface for gluing. I had some walnut left over from my sandwich making a few weeks ago and managed to whittle it into a (slightly larger) similar shape. It was planed down from 6mm to around 3mm and then the large part of the fboard glued onto it.

The following day the last part of the fboard was also carefully glued into place now that the main part was unlikely to wander. Once dry, the walnut was then sanded back to the outline of the original fboard and the dot holes redrilled.
The next stage for this fboard is to receive some LEDs. These need to fit in the 3mm walnut zone and have clear acrylic dots covering them in the fboard before it can be reunited with the trussrod. 3mm should compensate for the sawing, sanding and planing that the neck has had to endure in order to sort out the original duff trussrod problem. Well, I hope so...


Wednesday, 30 April 2008

A Chip Off The Old Block


The walnut sandwich body has now been cut down to size.


I had to resort to buying a jigsaw to do this job as I would have been there for a very long time otherwise. The jisaw leaves a reasonably clean edge, but the blade can bend so the edges are not square.


The photo shows how much was removed from the top left (where my arm would be sitting). Fortunately I am now quite happy with the new slimmed down shape and I prefer it to the original.


The next step is to cut out the holes in the body. The original design only had a cutout in the top part, but now to keep the guitar looking balanced, it is sporting holes in both upper and lower body halves. This is mostly done "just because I could", but also to keep the weight down a bit.


I didn't want to make a copy of an existing bass, but the more I looked and created at radical designs, the more I realised that a lot of the usual features are there for good reasons. The lower horn, for instance, needs to be cut away on the fboard side to allow access to upper frets (not that I get up there often...). The other side of the lower horn is shaped so that when playing the bass sitting down without a strap, it sits on my right leg and doesn't keep slipping away.


These large holes mean that there will be limited options when the time comes to fit volume controls, and the circuitry to animate the fboard will probably have to be located in the upper horn somewhere. No pain, no gain? Or fools rush in when all else are reading the newspaper?

Moving back to the neck, the trussrod fillet has been made from an offcut of the walnut. It has been shaped to complement the curve in the trussrod channel, and a groove cut in the top to allow it to fit snugly with the trussrod whilst giving more surface area for the glue that will be used to fix it in later.

Sunday, 20 April 2008

Fit Form and Function


I have got enough of the main parts of the bass cut out and shaped now to give it a trial run. Assembly by double-sided tape and it is ready to go.


Smeg!


It is now quite clear that the top part is way too big. My playing style is finger based (as opposed to using a pick) and I tend to have the strap fairly short. I don't have enough joints in my wrist to cope with a the long strap look with the guitar down by my knees - although that does look a lot better and has attitude.


My right forearm rests on the top of the body, just over the bridge. The way I had cut out the body parts meant that this top piece was around 70mm higher up than my regular bass. I don't feel that this would have prevented normal play, but it certainly would have an detrimental effect on ease, comfort and ultimately endurance.


Now is the time to do something about it. I had designed the outline on a big sheet of paper and at the time it looked fine. I couldn't play the paper version. Now the form has started to impact the functionality and as an engineer the outward form has the lowest priority of the three - though I don't want it to look too home-made like a couple of bits of plywood and a rusty nail.


So it was back to the drawing board (well the floor actually, as my plans are full size and the coffee table is only big enough to support the remote controls). As I have already cut out the walnut sandwiches (the W-plan diet?) any redesigning can only remove material not add any extra.


Lots of pencilling-in and rubbing-out later the new version 3 design was completed. Freehand sketching with curves and stuff is not something that I'm used to, but I find that eventually the bold lines start to blend together and the balance between top and bottom body parts reveals itself. I have managed to shave 40mm off without losing the essence of the look I was striving for. This leaves me with 30mm extra which can be angled to suit my forearm and should make the difference a whole lot less noticeable.


I won't be seeing these whales again until they've lost some weight...


In the meantime I got round to carving some of the headstock detailing. It will still need a bit of fine tweaking at a later stage, but for now it is about right and the tuners fit into the holes properly. At least one end seems to be going OK...


Sunday, 13 April 2008

Body Work

It is time to make a walnut sandwich. People that know me seem to think that I have a thing about food, but it is often no more than an unfortunate coincidence that I only ever see them at mealtimes. If they were to turn up at half past the hour they may look at me in a totally different light...


But enough about me.


As the neck is a combination of Wenge and Padauk (or WOPWOPOWPOW as I like to call it) I have gone for a body made from ash. Mostly it is because I like the large open grain pattern, but
I have heard it has pleasant acoustic properties and I'm always up for that too. I found a decent plank of it in my local timber merchants.


The ash measured about 10ft by 8in by 3/4in. This is not thick enough for a solid guitar body, so I need to laminate this to double its thickness. An ash to ash join would be fine, but not so aesthetically pleasing - which is where the walnut comes in.


The aforementioned timber merchant was visited again and a piece of 5ft by 4in by 1/2in walnut was found. This would result in a 2in thick guitar which is a little too chunky, so they managed to saw it down its length into two 1/4in thick planks. The sawmill operation cost practically nothing, but saved me a shed load of work.


The body shape had to be transferred from my full size sketch onto 'disposable' paper. This was then cut to make a template. The template was used to draw the outline on the ash. It is so much easier using a wood that shows a pencil mark.


As can be seen from the photo, ash is also very comfortable!


After passing the quality audit (!) the body shape was painstakingly sawn out of the wood using a coping saw. I was very glad at this point that it was only 3/4in thick. This is the upper part of the body.


Ash is definitely a hard wood and I snapped three blades whilst sawing out the four shapes (2 upper & 2 lower). Normal people would use a jigsaw or some other powered method of convenience, but I would only make bigger and quicker mistakes so I'll stick to the man-draulic ways for the time being.


The walnut was cut into sections, half-heartedly book-matched and glued to make a wider (approx 8in) piece. This had to be clamped together whilst being squashed flat.


There is no doubt that at this point, something in the room was as thick as two short planks.


Once dried this was glued to one of the ash body parts. The photo shows a lower part - the grain looks quite striking. It seems that attractive grain is synonymous with warping, so the back had to be planed flat before the walnut was attached.


Once dry, the walnut was cut to match the ash outline, using the coping saw once more. This was a doddle being only 1/4in, and then it was nearly ready for the other side.

I routed a groove (thanks Chris J - I've still got your router) so that pickup wires can be threaded through. This last pic shows the two parts just before the walnut sandwich is assembled. Ah - that reminds me - what time is it? Fish-pretzel time?


You should have seen the size of the one that got away...